Only a month since the last interim release and here we are again!
As you can tell from the version number bump this is a mostly minor release but there are a few goodies in there.
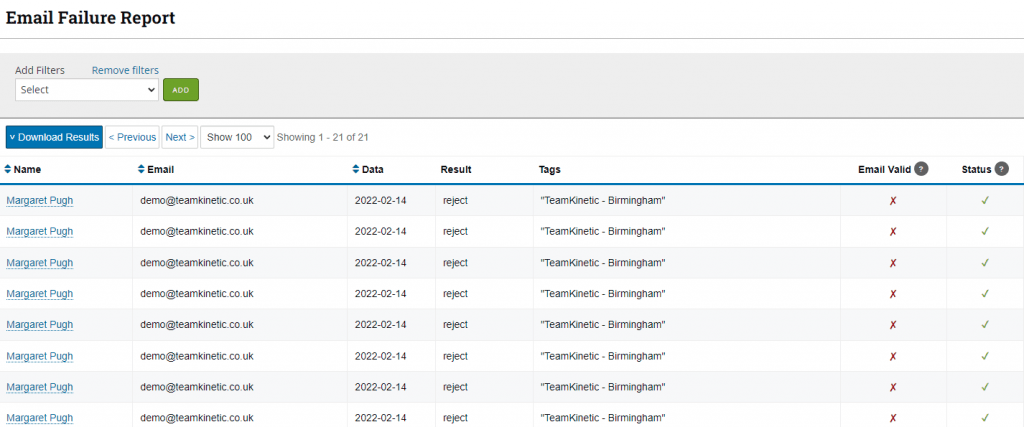
Email Failure Reports
Our Enterprise level customers can now see a report of the last month’s email failures. This includes hard bounces, where the email was returned for some reason and could not be delivered, rejects where the email address does not exist, and spam responses where the user has reported the email as spam.
In the case of rejects and hard bounces, the volunteer or provider email is marked as INVALID and in the case of spam reports they are marked as DO NOT SEND EMAILS. In both cases the email address will no longer be sent any bulk group, or weekly emails.
We are working on including the email content and subect so that you know which email raised the error and failed.
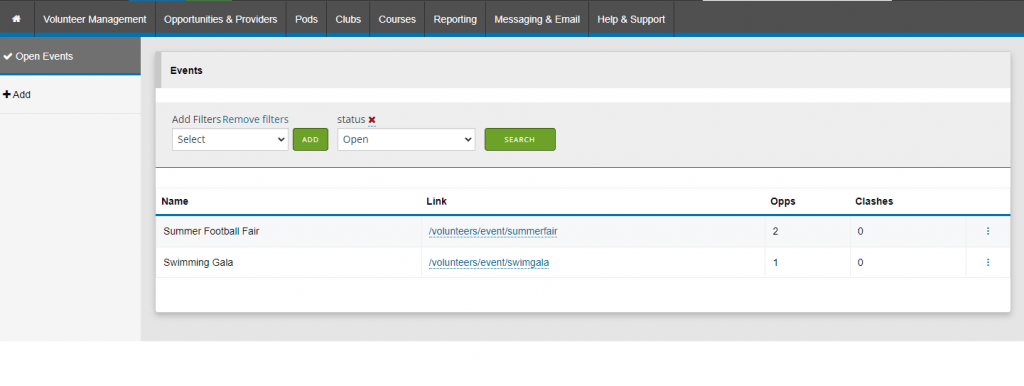
Event Area Updated
The event area has now been updated to match the look and functionality of the volunteer and opportunity search and manage pages. It looks a lot easier on the eye and for those of you that run a lot of events, you can now easily search them.
Storage Improvements
We’ve mow moved nearly all of the image and document storage to Amazon’s S3 which should improve load and caching times for images like the opportunity images, event images, downloadable documents etc.
There will not be any visible changes and it should be totally transparent to our customers.
Club Functionality Integrated
For those enterprise customers that use ClubKinetic, this has all been integrated into the main top menu bar under the, obvious heading, clubs!
The pages have also been updated to match the layout and functionality of the main areas.
New Qualifications Search Filter
For those customers that use volunteer qualifications you can now filter your volunteers on their uploaded qualifications.
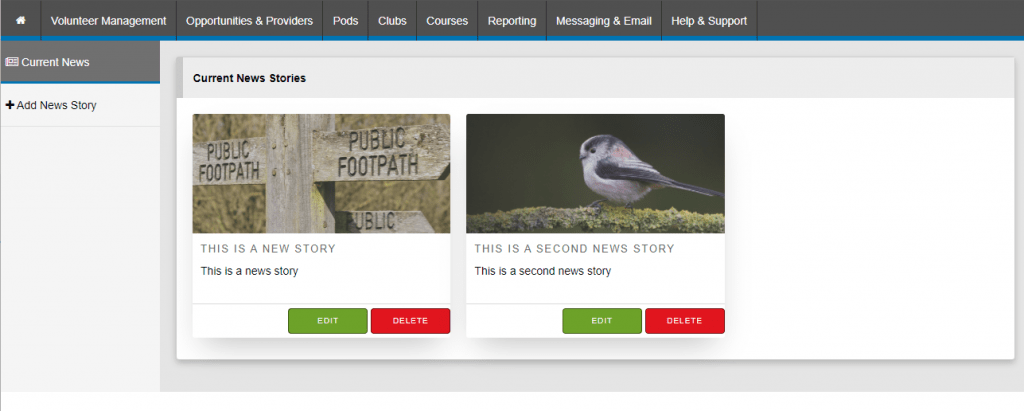
Refreshed and Update News Area
For the administrators the news area has been refreshed and now looks and acts the same as the main areas of the application.
More Sortable Tables
We’ve added some simple sorting to tables that are not paged through many records, for instance the open opportunities table on the admin dashboard. Just click the column header to sort and each time you click the sort direction will be reversed.
There are also the normal smaller bug fixes and visual immprovements throughout the application. Many thanks to everyone that opens support tickets with ideas or lets us know if something isn’t working properly.
You’ll already be on the new release by the time you read this, so enjoy and get in touch if you have any comments.
We’ve recently released TeamKinetic version 2.09 and you may have noticed a few new features. We’ve added new emailing and expenses features in our latest update.
New Email Features
The video above lays out all the new features.
When creating bulk emails you can now select any number of opportunities to be included in the email. You have the option of including the events that week and if you want to show the volunteer’s statistics across the top. These are all displayed in exactly the same way as within the newsletter so its now possible to send a newsletter type email to any of your volunteers, for any of your opportunities, whenever you like!
We have also rearranged and refactored the preview and draft buttons so you can now send a preview email to your email instantly and save a draft copy without leaving the page. We also now update the saved draft each time you hit the save draft button, rather than creating a new draft.
New Expenses Feature
The video above lays out information needed when adding/processing an Expense.
This is an Enterprise only feature. Administrators will have to switch this module on and off via the Super Admin Menu → Options → Opportunities → ‘Use the in app managed expenses module’.
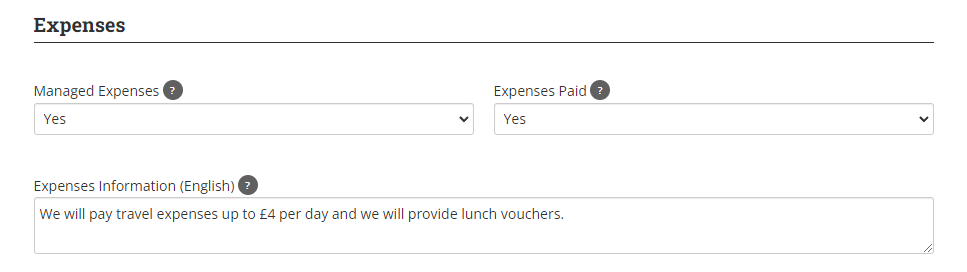
Opportunities can now either be marked as ‘Managed Expenses’ and/or ‘Expenses Paid’.
Expenses Paid simply means that volunteers will be reimbursed. In this case, you should add details about what expenses are paid and if there’s a cap on the amount. This is useful for providers to specify that their opportunity pays expenses. Managed Expenses means that volunteers will be able upload expense claims which can then be managed by administrators. Managed expenses are always also marked as expenses paid.
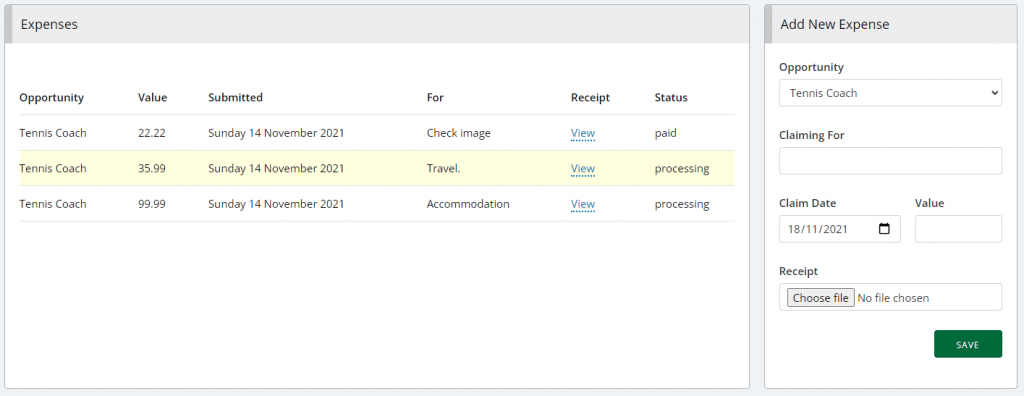
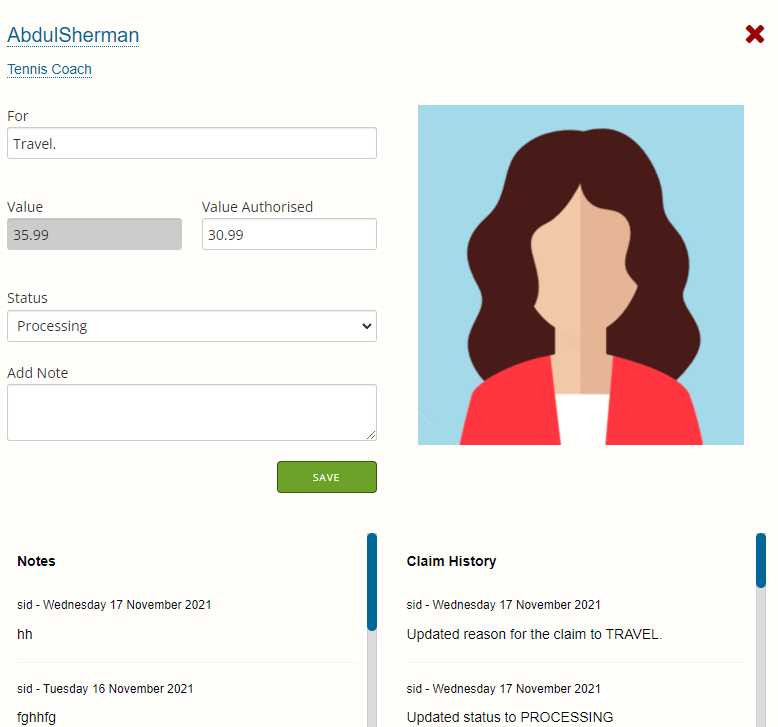
If enabled, volunteers can select applicable opportunities from their dashboard, upload a receipt, an explanation of what the expense is for, and the amount they are claiming. Admins will get an alert when a new claim is submitted by a volunteer and can manage them all from a simple interface. The admin can view the receipt, adjust the claim amount, and update the claim status. A full history of changes and notes is maintained and viewable underneath the main claim.
Any issues?
New updates can create small problems elsewhere in the site (despite rigorous testing!) If you run into any issues on your site, don’t hesitate to reach out to us. You can either use the live chat feature, or raise a support ticket.
Another great value interim release for you all, and only a few weeks since the last one! This one is all software based, no hardware or infrastructure updates, which is much better for my health and sanity =)
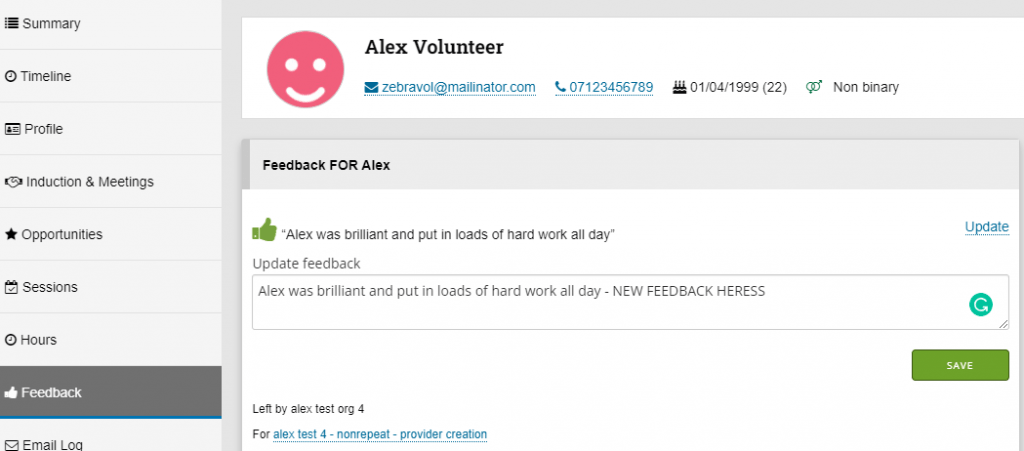
Update Feedback from Volunteer Dashboard
Providers and admins can now update a volunteers feedback from the feedback section on the volunteer dashboard page. Just hit the update link and you can save it right there – no refresh required.
New Translation Engine
For those customers (Enterprise only) that use an alternative language to English (get in touch if you are interested) we have now brought all translations in-house to our own replacement engine.
This has a number of advantages; we can update and add new replacements fast, translator marked Super Admins can provide translations right there in the Super Admin area, and they can request new replacements to be added.
Using our own replacement and translation engine has increased the page load time for translated pages by four fold, an excellent result.
Send Custom Newsletters Whenever You Want
The bulk email system has been updated to use the same HTML wrapper as the weekly newsletter, so all your bulk emails will now look better and have more branding elements for your organisation.
When creating bulk emails you can now select any number of opportunities to be included in the email. You have the option of including the events that week and if you want to show the volunteer’s statistics across the top. These are all displayed in exactly the same way as within the newsletter so its now possible to send a newsletter type email to any of your volunteers, for any of your opportunities, whenever you like!
We have also rearrange and refactored the preview and draft buttons so you can now send a preview email to your email instantly and save a draft copy without leaving the page. We also now update the saved draft each time you hit the save draft button, rather than creating a new draft.
Expenses Module – First Phase
This is another great Enterprise only option to help you manage your expenses. You’ve been able to mark an opportunity as expenses provided for quite a few versions now. This new module closes the loop for expenses.
Volunteers can select applicable opportunities from their dashboard, upload a receipt, an explanation of what the expense is for, and the amount they are claiming.
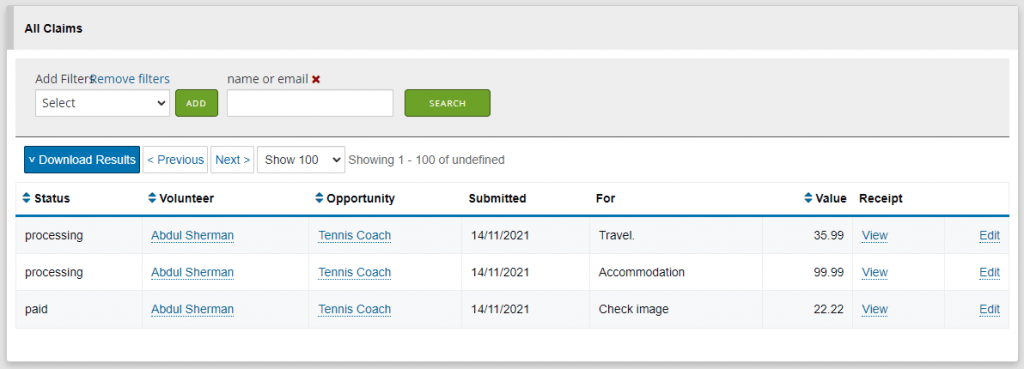
Admins get an alert when a new claim is submitted by a volunteer and can manage them all from a simple interface.
The admin can view the receipt, adjust the claim amount, and update the claim status. A full history of changes and notes is maintained and viewable underneath the main claim.
We have also added some additional profile data points for UK bank account and sort codes which are only requested and stored if a volunteer makes an expenses claim. One day we hope to create some in app payment methods but we’ve yet to find one that has been acceptable to the majority of our customers yet…but we are still looking!
The managed expenses module is an enterprise only feature. Administrators can switch this module on and off and allow trusted providers to be able to mark an opportunity with the managed expenses flag. The managed expenses runs alongside the regular expenses flag, so anyone can still mark an opportunity as paying expenses, and this will show in the search filters and opp description, but only enterprise admins and trsuted providers will be able to add this managed aspect to those expenses.
Front page customisations
Our new front end (if you are not using it we suggest switching it on as volunteers seem to prefer it!) has some extra customisations, and now they are all also available in your chosen alternative language (enterprise only).
If you can’t find a suitable image, then it will fill the background with some of your chosen colours with a subtle animation effect so it will still look great even without an image.
Accreditation Improvements
We’ve standardised all the accreditation badge prints now so there will be zero variability between badges no matter how you print them.
We’ve also added the help and support menu to the accreditation menus so you can open support tickets straight from there without having to return the main volunteer menu.
The event access screen now accommodates the full 12 possible areas for each event and correctly displays access for each selectable zone.
There have also been quite a few small improvements and enhancements to the UI/UX as we harmonise it with the main application.
You can try out these features as normal on the beta site before the interim gets pushed out on 5th December. We’ll be notifying everyone and getting together some training videos and materials to make sure you can hit the ground running.
Closing Opportunities Added to Dashboard
Opportunities that are closing within 7 days are now shown to providers in their dashboard under the tasks panel.
These have been available on the administrators dashboard for a little while now but have now been brought across to the provider dashboard as well.
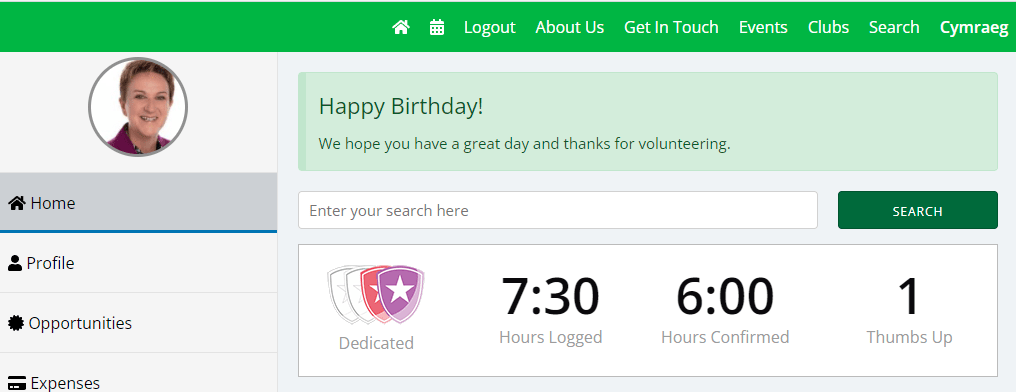
Happy Birthday Message for Volunteers
Just a little message on their dashboard when it is their birthday, wishing them the best and thanking them for volunteering.
We’ll be adding more life events to these notifications over time, like anniversaries of them registering, joining their first opportunity, logging their first hours etc.
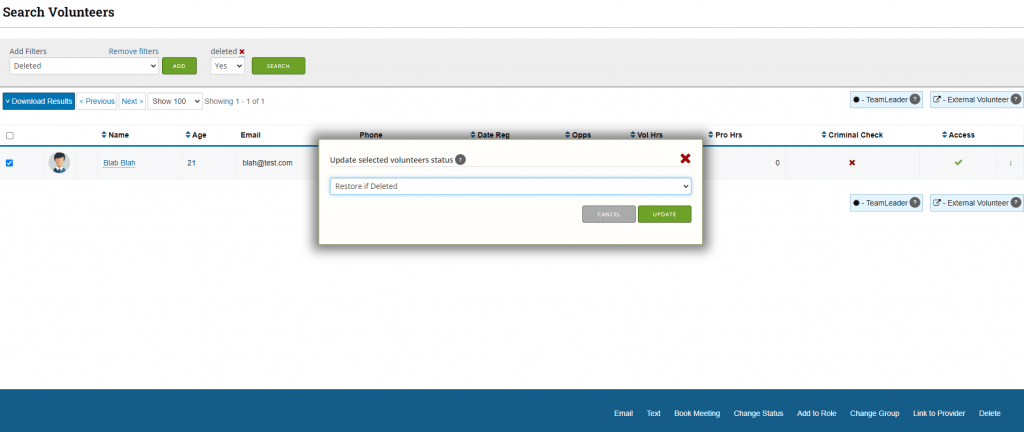
Restore Recently Deleted Volunteers
We receive quite a few support tickets where administrators have accidentally deleted a volunteer, or deleted the wrong volunteer.
So we have implemented a restore feature that will work for 48 hours after the deletion. You can use the new DELETED filter in the volunteer search page to find all the volunteers that have been deleted in the last 48 hours. To restore a volunteer just hit the checkbox next to their name and then use the CHANGE STATUS bulk action in the bottom blue bar to restore them.
Once the 48 hour period has expired you will not be able to restore that volunteer. We can restore volunteers after this period for upto 30 days from cold storage backups but there is a charge.
Administators cannot restore a volunteer that has removed themselves, for obvious reasons; however all their hours are anonymised and retained.
Anonymised Hours from Deleted Vounteers Included
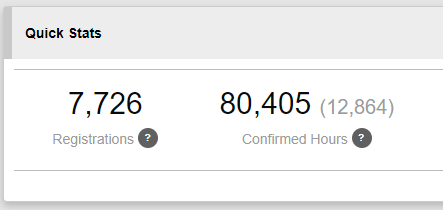
You can now see your anonymised hours from deleted volunteers in the quick stats area of the reporting pages. It combines the totals and highlights the total from deleted volunteers in brackets.
The date of removal is used as the hour logged date.
We have had a busy few weeks and have rolled out another interim release packed full of useful changes and updates suggested by our users.
Additionally we have also updated our infrastructure over the last few weekends with minimal distruption. All our servers and virtual environments are now on the latest server operating system and our database has also been updated to a new version. We’ve also thrown some more hardware at the application and I hope you have noticed some snappier responses.
Custom emails for opportunities
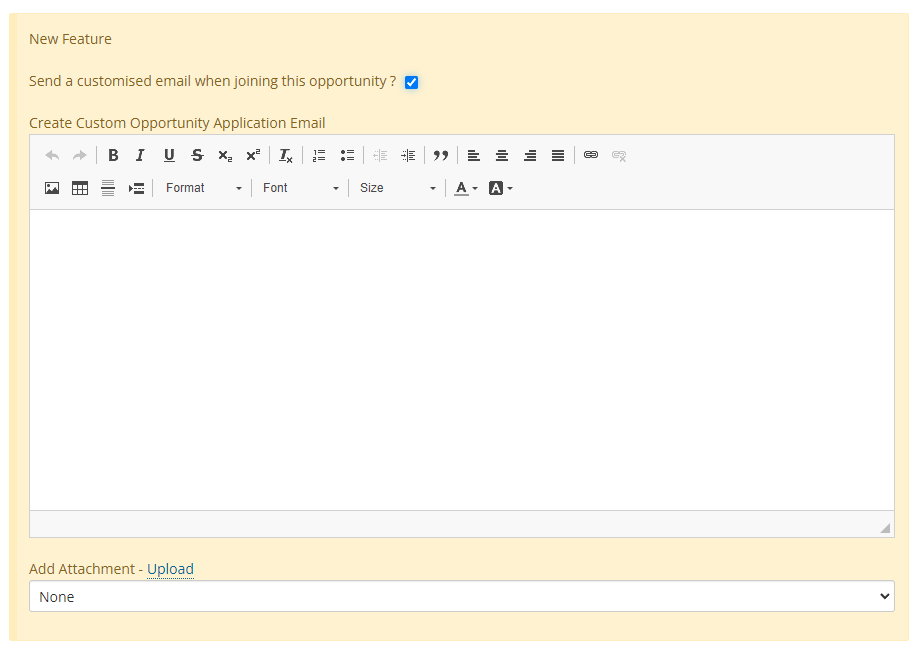
You can now add a custom email to an opportunity that is sent when a volunteer joins INSTEAD of the universal email (the universal email remains accessible and customisable as before). So if you have a special message to give to volunteers that join certain opportunities here is your chance.
It’s super easy to use and access, quick check box to say you want to use a custom email then you will see the normal editor window where you can craft the email.
Administrators can add an attachment to these emails from the normal list of email attachments you are used to seeing in the bulk email and email customisation areas.
Remember, this email is sent INSTEAD of the universal one, so be sure to include full details.
Custom email for role applications
Just as above, now when super admins are creating or editing roles they can add a custom email that is sent when a volunteer applies for that role.
It all works identically as for custom opportunity emails, and once again is sent instead of the universal email.
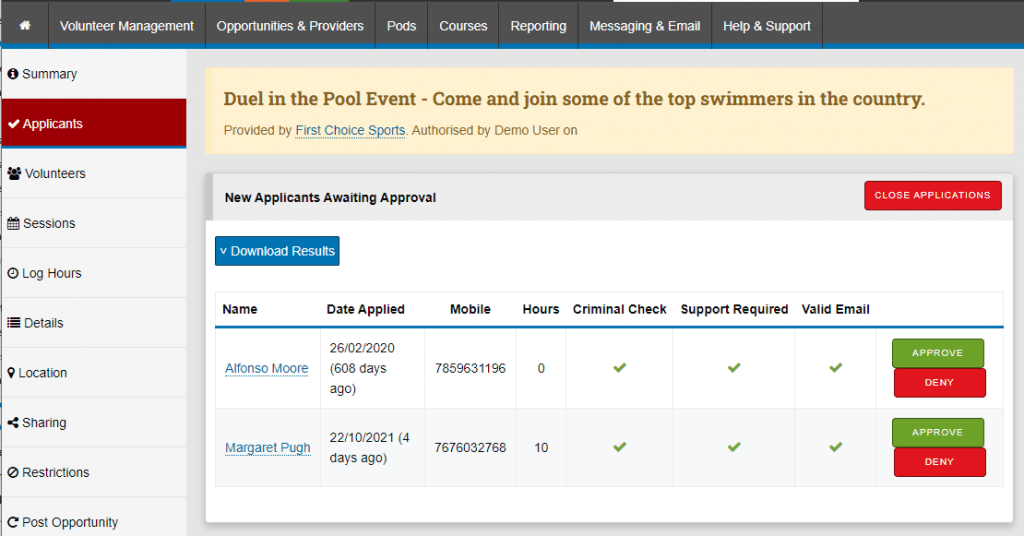
Close applications for an opportunity
Admins and providers can now hit a button on the APPLICANTS tab for apply first opportunties which will close applications for the opportunity without closing the opportunity. This enables already accepted volunteers to carry on as normal, and access new sessions, without attracting any new applicants.
Opportunity image enforcement option
Super Admins can now elect to switch of the mandatory upload of images for each opportunity. This option is OFF be default.
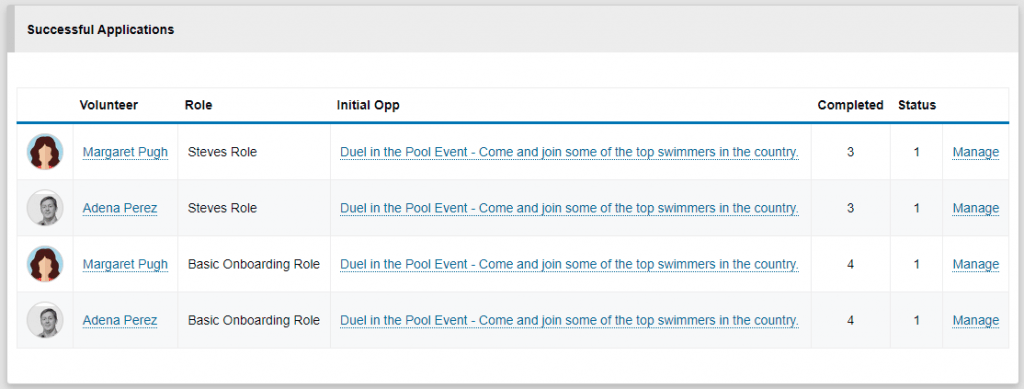
Information about the opportunity the intial role application was for
When a volunteer first applies for a role we record which opportunity this was on. We used this to enable the auto application to the opportunity if it was required, once the role applicaiton was complete and successful.
We have now started to show this information on the role management page so you know which opportunity the volunteer was originally interested in.
The volunteer also gets this information, along with a link to the original opportunity so they don’t need to hunt around to find it.
New and fixed reports
We have added a pie chart showing the proportion if volunteers on events and opportunities that have reported as having special needs or disabilities, downloadable of course.
The pie chart showing the ethnicity of volunteers on opportunities and events was not using distinct volunteers, but all the joined sessions. This has been fixed and is now accurate and the total volunteers will match the number given in the summary for volunteers.
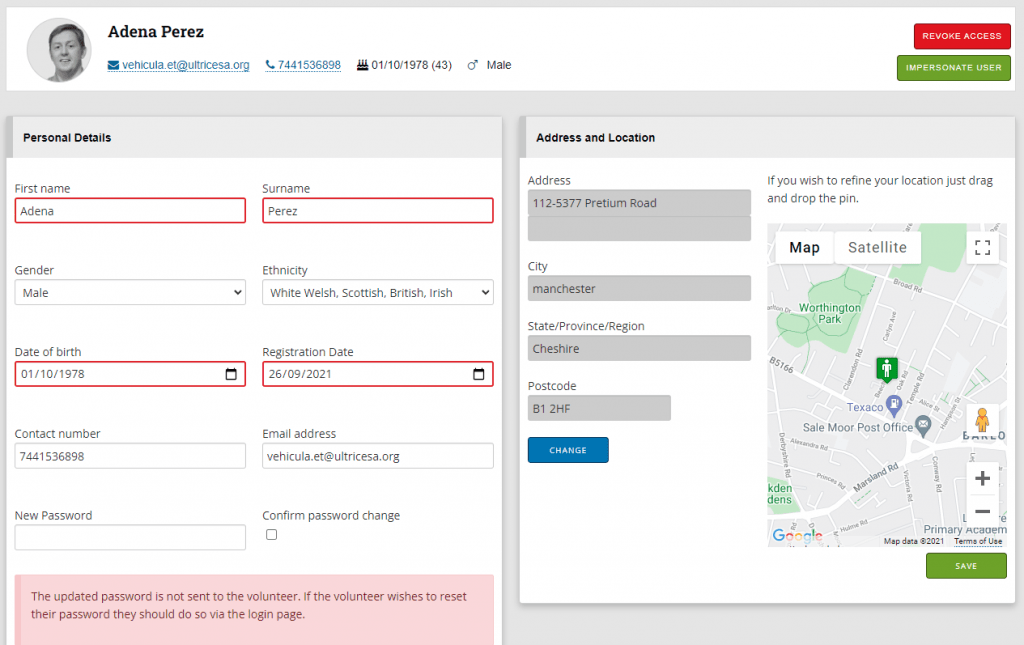
Improved profile editing for volunteers
The layout when editing the profile for a volunteer has been tidied up and the various layouts for external volunteers, provider editing pages have also been improved.
We have split out the location aspects of their profile from their personal details, so you can update and edit independantly. This will help where location details have not been recorded properly but you still need to update other aspects of their profile.
Feedback report is now downloadable
Added a download button to the feedback report page so you can grab a full list of all the feedback at anypoint.
New filter for searching volunteers
You can now choose in the TYPE filter, to show volunteers that will and that will not receive bulk emails. A volunteer only receives bulk emails if they have opted in, have a valid email address, and have been granted access.
Faster searching
The opportunity search page speed has been improved by excluding distance calculations where possible and also using a boundary box method of finding matching opportunities rather than calculating the distance from the volunteers location and all other opportunites.
This is not as accurate but much faster and the accuracy is perfectly acceptable for this search. This means that empty or null searches, which are by far the most performed search such as;
can return the maximum 250 opportunities in less than a second.
Providers having multiple accounts is now optional
The ability for providers to create their own sub accounts for collegues to use to login is now an option. You can find it in the super admin menu > options > everything else tab.
Better ordering of completed opportunities for volunteers
When volunteers view their opportunity tab in their dashboard, completed opportunities were ordered by their start date (age). We’ve switched this around now so that the opportunities are ordered by the date of their last session on that opportunity. So the opportunity that was mostly recently completed is at the top.
In app criminal checks
We are just finishing our initial development of in app criminal checks with KnowYourPeople in the UK. This wil mean you can fill out a simple form in the app, send it off and within 24 hours or so you will have the completed criminal check details available on the volunteers profile.
They will also send the certifcate to the volunteers address and your organisation name will appear on the certificate.
We don’t have finalised prices for the each check, but we are confident they will be less than £12 per check for the enhanced version.
If you are interested in trialing this new feature please get in touch.
Over the weekend we have been finalising the interim release for TeamKinetic 2, we have fixed many minor bugs and issues and also added some functionality that was missing or didn’t quite make the cut for the initial release. You don’t need to do anything, and all installations will be upgrade by Sunday evening.
Edit opportunity images after creation
You can now choose a different existing opp image, or upload a new one when editing an existing opportunity.
Custom Opp Badges in Alternative Language
If you uuse an alternative language in your installation you can now create and edit custom opp badges in your alternate language. The alternate language is also displayed to volunteers of course if they have selected it.
Providers Can Edit Their Users
Providers can now edit their created users and reset their passwords instead of having to delete and re-create.
All Provider Users Can Reset Their Own Passwords
The FORGOTTEN YOUR PASSWORD link and reset process now also works for the extra provider users as well as for the main central account.
New Role Application Notification
Administrators now get a notification when a volunteer applies for a role the first time.
New Providers Can Access Help Menu
New providers that have not yet been cleared can now access the help menu and help resources, including the contact pages. This will help new providers orientate themselves before they are cleared.
New Opportunity Features Are Copied
The new opportunity features that we have introduced are now also copied across to the new opp when copying an existing one.
Volunteers Can Withdraw an Opportunity Application
Once a volunteer has applied for an opportunity a button will appear allowing them to withdraw that application. This button is visible until the application has been accepted or refused.
Sticky Table Headers
For volunteer, opportunity, and provider searches, where the resulting data list can be pretty long; we have added sticky table headers. As you scroll down the page the column headings will get fixed to the top of the page so you can always easily see which column you are looking at.
Volunteer Feedback
When feedback from volunteers is not enforced (Super admin – Options – Opportunities – Enforce opportunity feedback), any feedback given to a volunteer from a provider is still shown. Previously this option worked as a switch to turn feedback on or off globally.
Provider Notification Improvements
A number of the provider notification emails have received some improvements, like the volunteer’s session list being included when a provider is notified about a new session signup by a volunteer.
Thanks for all your suggestions and for letting us know about any issues or bugs you have found, its always useful.
Roles are a brand new feature for version 2, they sit above opportunities and enable a prescribed on-boarding process for volunteers. Roles are a great feature for organisations that have regular opportunities that are undertaken under the same set of compliance, training, or on-boarding rules.
An opportunity can belong to one or no role and once a volunteer has successfully completed the steps for a role, they can subsequently join any opportunity that belongs to that role; the role authorisation is valid across any opportunity in that role.
Creating Roles
Creating role is only possible for super admins and is accessible via the super admin menu in the SETUP section.
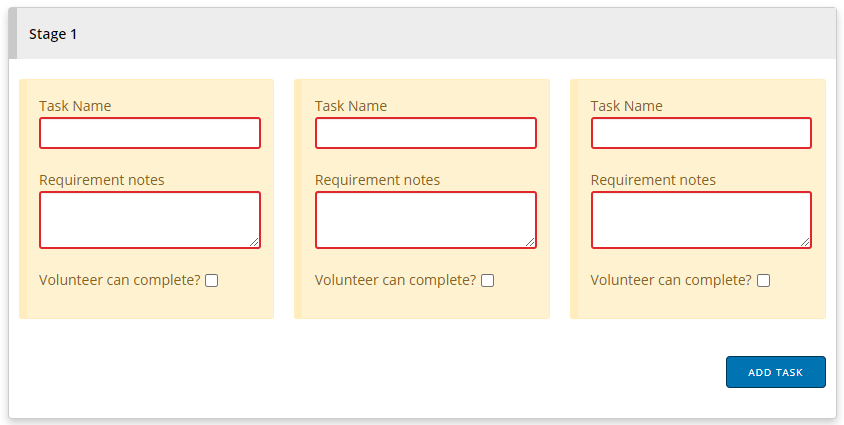
Click the add button to create a new role. You’ll be presented with a split screen form with the role name and description on the left, and the default four stages on the right.
Start by filling in the role name and its description to help volunteers decide if they want to apply for the role.
When you are ready to start adding tasks to your stages click the add button. This will open up a sheet with the task name and notes for that task. Additionally you will see a checkbox labelled ‘Volunteer can complete’. If this box is checked then the applying volunteer will be able to mark this task as complete without any admin oversight. This is great if you just want to check a volunteer has read a document or get an auditable confirmation that some step has been carried out.
You do not have to add tasks to every stage, the tasks do not need to be completed in order, and a stage can have no tasks at all if you prefer to put all the tasks in one stage.
Once created you can edit, archive or restore a role and the setup page shows you a brief summary of the role and its current status. When editing a role you can add or remove tasks and update the role name and description. Be aware that adding tasks will not affect those volunteers that have already been accepted on the role.
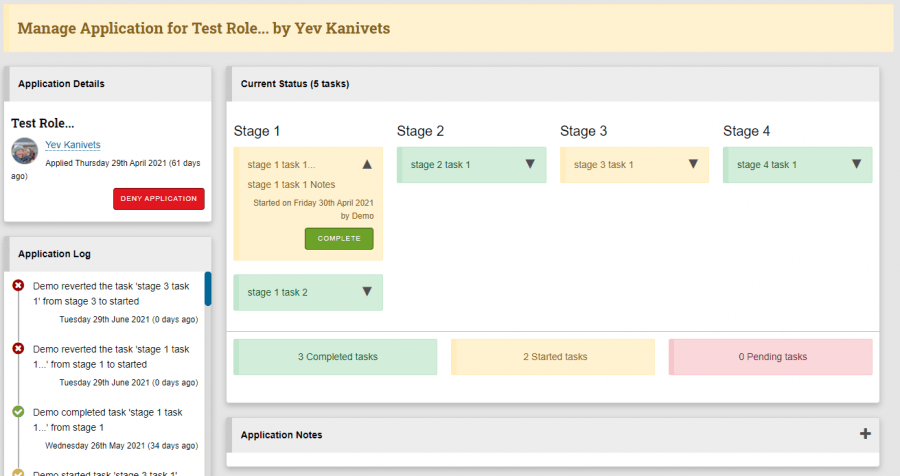
Managing Role Applications
All admins can manage volunteer role applications and outstanding role applications will appear on the admin dashboard for attention.
Just hit the manage button and the full status and history of the application will be shown. This is a pretty comprehensive screen but super easy to use.
You can move the status of any task forwards or backwards, from pending to started and finally complete. You can add notes that other administrators can read and update the overall status of the role application to approve or deny.
We have the intermediate status of STARTED for a task so that if a task takes time to process for an admin, another admin doesn’t repeat any work whilst the first admin is completing the task.
Importantly all steps taken are logged and viewable in the application log window. You can see here when tasks were started, completed or reverted back a stage, when people left notes, or when a volunteer has completed a task.
A volunteer will see their role applications on their dashboard. By clicking the more details link they will get a full breakdown of the current role and from here will be able to complete any suitable tasks.
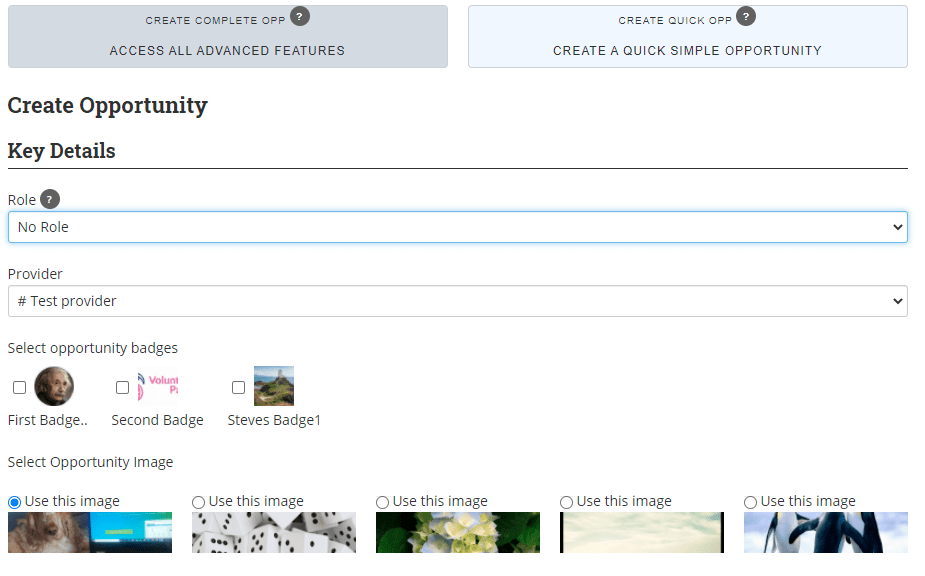
Adding a Role to an Opportunity
It’s a simple task to add a role to an opportunity. If any active roles exist, they will appear in a drop down when creating a new opportunity.
If you update an existing opportunity and add a role requirement it will only affect volunteers that join after that point; existing volunteers will not be affected.
Advertising an engaging volunteering opportunity is not always the simplest task. And often the clearest messages can become disfigured, resulting in your opportunity becoming less attractive to prospective volunteers. Below we’ve identified some examples of how to design and present a strong volunteering opportunity on your TeamKinetic platform. Each element has been streamlined to guide you through an on-brand TeamKinetic experience that is engaging and most importantly, eye appealing to your volunteers.
Where should your opportunity live
The most obvious place of all is your own website, for your prospective and current volunteers your website provides a safe and secure portal in which you can display your volunteering opportunities clearly for all to see. In turn, it will also allow you to easily collate data on the number of people viewing your opportunities page, by monitoring web analytics with Google Analytics.
Name your opportunity
Be clear and concise, over the years we’ve seen many volunteer managers fall victim to the mistake of over advertising their volunteering opportunity. The best practice would be describing the opportunity in its simplest form by using as few words as possible, for example ‘volunteer caretaker’. By over complicating simple roles with complex names will only off put your volunteers. You may also wish to add a location, contact email and phone number as these are the key details which your volunteer is likely to need straightaway.
Outline your opportunity
Now here’s your opportunity to say more, no pun intended… When writing your descriptions keep them short and sweet, whilst listing the main tasks the volunteers will be expected to do during the opportunity.
Why not offer an incentive? We’ve found from customer feedback that these make the opportunities more appealing to volunteers. For example, an incentive may be unlimited tea and biscuits or a free T-shirt. If we know anything about volunteers we know they love tea and biscuits.
Finally, summarise the benefits. In this part you will want to describe how this volunteering opportunity will bring your volunteer’s fulfilment. How will their volunteering efforts make a direct impact?
Be clear in your presentations of your opportunity, make key information stand out.
When and where?
These are the fundamental outlines which are absolutely necessary when creating your volunteering opportunity. Day, time and location will outline the commitment time frame in which your volunteers will have to make. Also if possible make clear what type of volunteering opportunity this is, event, ongoing or just a one-off.
Show off the good REVIEWS
Make your feedback visible, think of your feedback like your own personal catalogue of reviews. In a modern world filled with decisions, reviews offer simple and relevant guidance. Similarly to this, the feedback from previous volunteers will provide guidance to your potential volunteers, encouraging them to enjoy the same positive experience.
Call for action
Always leave some visible call to actions, these will encourage the volunteer to perform some form of action. Call to actions may be subtle but they are all nudging your volunteer to do one thing. And that’s registering on your opportunity.
Call actions can include
Social media sharing links
Document printing
Internal links (other opportunities, company website)
Register / Logging in options
Here at TeamKinetic we can help with all your volunteer management needs. Go to our website to create a demo site – it’s completely free! You can also call us on 0161 914 5757 with any questions.
Don’t hesitate to reach out on social media, you can find us on Twitter, Facebook, and LinkedIn. You can also go to our YouTube channel to see some examples of the features we have to offer and some of the people we already work with.
TeamKinetic have been recognised by TechForce 19 as a technology provider that can help in the response to the COVID-19 pandemic. The following webinar is showcasing our new COVID-19 Task System, called the Community Task app – designed and made for COVID-19.
You can find TeamKinetic on social media and listen to our podcast:
We are delighted to see more organisations decide to use our COVID community task app and we recently zipped past the 2000 completed task mark.
We have been responding to feedback and continuing to develop the application and functionality; the most recent additions are showcased below.
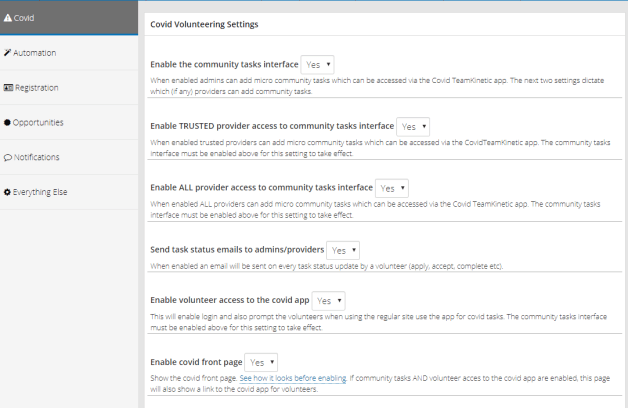
Remember if you want to enable the COVID community task features you can do this at anytime from your super admin options menu.
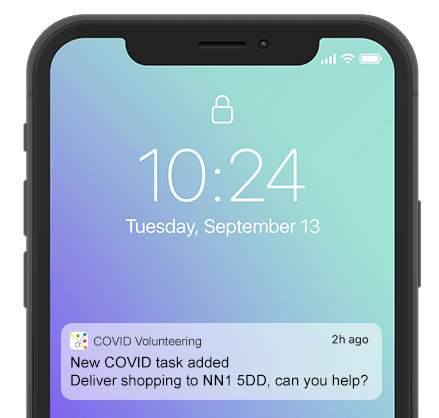
Push Notifications
Users of compatible devices and browsers will now receive push notifications when new tasks are created or when any actions that concern them directly are performed; task application updates and new task chat messages. Unfortunately, Apple iOS devices do not offer support for push notifications via progressive web apps. Apple iOS users will continue to receive notifications via email when their task status changes or chat messages are sent.
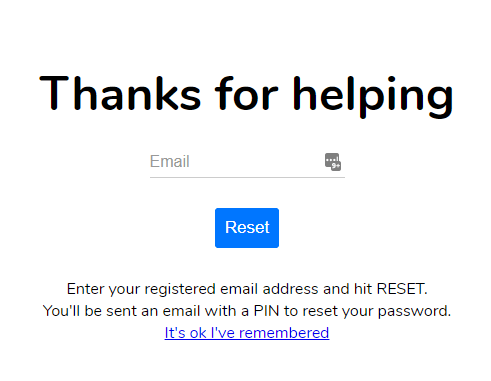
Password Reset
Volunteers can now reset their password directly from the app. They can enter their registered email address and will be sent a PIN which they can enter directly into the app and generate a new password.
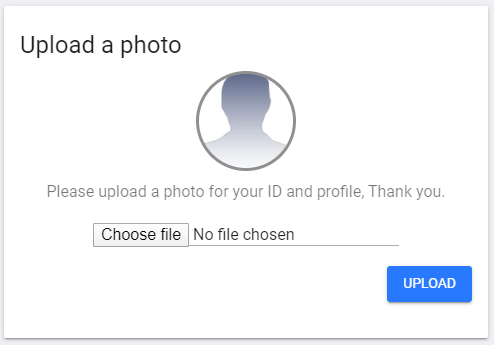
Photo Upload
When logging in, if the volunteer does not yet have a profile picture uploaded, the app will ask them to upload one.
The volunteer can change their profile picture at anytime by tapping on the current photo.
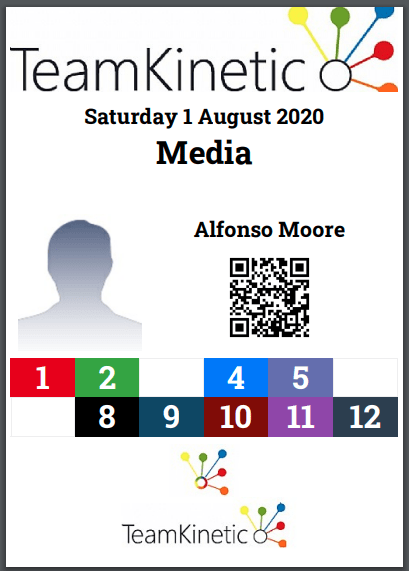
ID Card and QR Code
We have added an ID card to the volunteer app so that if challenged when outside the volunteer can show some evidence that they have a valid reason for leaving their home. The included QR code when scanned confirms the volunteers photograph and current status.
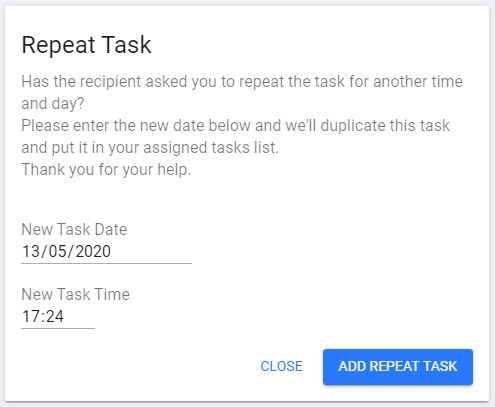
Repeat Tasks
A volunteer can now enter a repeat task when completing an existing one. So if the recipient asks the volunteer if they can come back next week, they can record it and you can track it just like a regular task that you have added.
All the task details will be replicated, except the date and time and auto assigned to the volunteer.
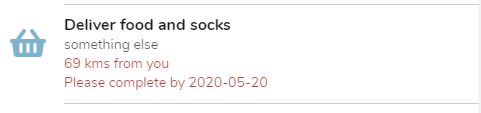
Target Completion Date Shown
The target completion date is now shown on the assigned task list without having to tap to show the task details.
Did you know that you can customise your TeamKinetic system’s volunteer registration emails? Changing the first email your volunteers receive can be a big step in improving your volunteer management.
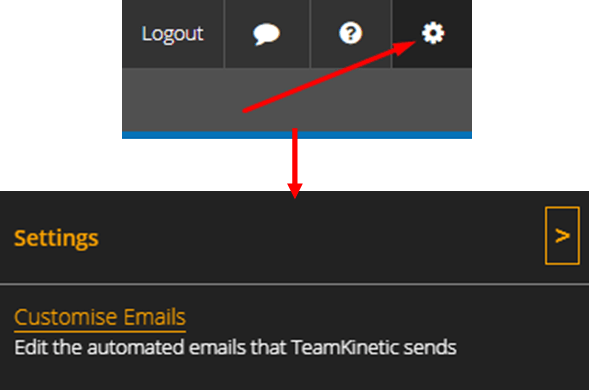
How do I change the registration email?
Go to the Admin Settings Cog→ Customise Emails
Find the ‘volunteer registration’ email and click ‘Edit’.
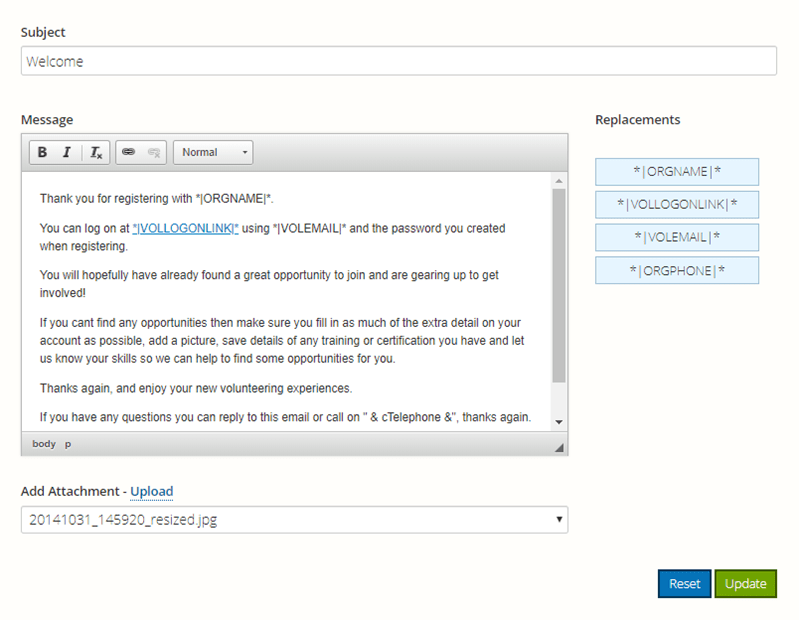
You can now edit the default text and style it accordingly. When you click on the blue buttons on the right, a placeholder will be added to your text, and when sent, that placeholder will be replaced with the appropriate text; in this case you can use placeholders for your organisation name, organisation contact number, the volunteers email address, and a login link for the volunteer to follow.
What changes should I make?
That first email after registration should layout the next steps you want the volunteer to take. For example, this might be to upload a photo and a piece of ID. You could also direct them to the Resources & Help, where all the documents in your document hub are available, if your volunteers require extra information after registering.
You can alter options regarding volunteer photo/ID uploads via the Admin Settings Cog → TeamKinetic Options → Everything Else.
Volunteers can easily access these things through the left-hand-side menu on their dashboard.
They should go to the underlined tabs to upload a picture, ID, and view the document hub (in that order).
You can also add links to various areas of the system for easy access and attach files to the email. For example, you could share the link to take them straight to a search for COVID-19 related opportunities. This will help highlight ways volunteers can help their local communities. You can find your shareable link to all COVID-19 opportunities on your admin homepage:
If necessary, make sure to tell new volunteer about inductions, DBS and ID checks when they first join to allow them to get started with you as soon as possible. As an admin, you can keep track of DBS checks via Volunteer Management → Criminal Checks as well as visiting a volunteer’s profile directly via Volunteer Management → Search Volunteers.
You could also customise the ‘joined opp’ email that is sent when a volunteer joins their first opportunity to let them know what you want them to do next. Perhaps explaining the keywords used on the site, such as sessions, the different opportunity types, and how to log hours.
What else can I do to get volunteers started?
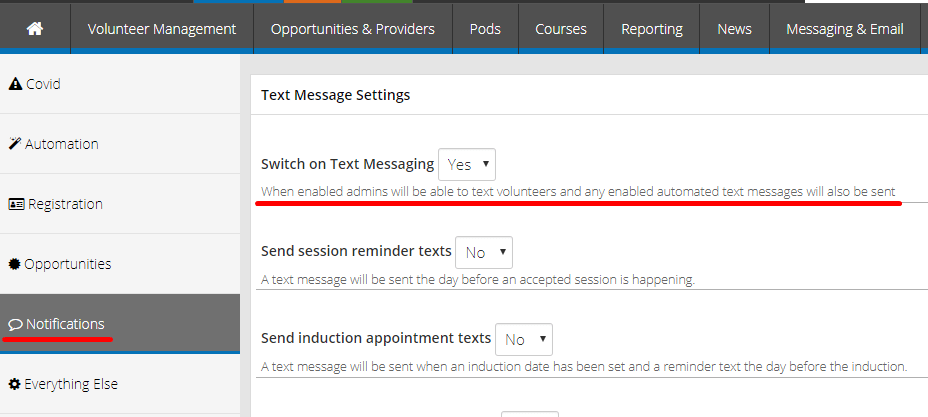
Switching on text messages is another great way to keep in contact with your volunteers. Text messaging can be switched on by going to the Admin Settings Cog → TeamKinetic Options → Notifications → Switch on Text Messaging.
Building your Document Hub can also be highly beneficial to your volunteers. You can add documents, links and text for your volunteers and providers, e.g. a code of conduct or training manual for new volunteers. To access the document hub, go to the Admin Settings Cog → Document Hub
Want more TeamKinetic tips?
Subscribe to our blog for more like this as well as other pieces relevant to volunteering and volunteer management. You can also follow us on Twitter,Facebook, and LinkedIn.
You can visit our YouTube channel to find further help navigating your system or call us on 0161 914 5757, we’re always happy to help you out!